Beautiful graphic, fairy tales like story, friendship of human and animal, non stop advantures.
Never Alone (Kisima Ingitchuna) is constructed around the story and tales found in the folklore of the
indigenous Alaskan people, the narrative follows a story of bringing
balance to the “eternal blizzard” by going to its source. The
influencing stories set to make an appearance include the Blizzard Man,
The Little People, Manslayer, The Rolling Heads and Sky People, but the
game will be split across eight separate chapters to better facilitate
the puzzle platforming structure of the game. Experience the epic journey of Nuna and Fox as they
search for the source of an eternal blizzard that threatens the survival
of everything they have ever known.
Never Alone has two main characters in the game that travel through the 8 separate chapters together, they are:
Nuna – Nuna is one of the Iñupiaq,the Alaskan Native folk and she is
adventuring with an arctic fox. Skilled in the use of a Bolas, Nuna is
one of the games two main playable characters.
The Arctic Fox – The Arctic Fox is a pure snow white companion that
is going to be travelling with Nuna throughout the adventure, the fox is
considerably faster than Nuna bu is obviously lacking the means to
throw the bolas like Nuna.
The gameplay of Never Alone follows that of the typical “atmospheric
puzzle platformer”, this is perhaps a genre best represented in the
hugely popular game, Limbo. Never Alone however takes on an entirely
different art style that makes the game somewhat singular in this
regard, opting to go for a more desaturated chalk-like pastel esque
art style.
The player takes control of the young Alaskan Native, Nuna and her
pure white Arctic fox. The primary puzzle platforming mechanic in
Never Alone is that the player can swap between Nuna and her Fox to help
solve puzzles and progress through the game. The fox is much faster
than Nuna,as you would expect, but Nuna can pick up items and can use
her Bola (the Bolas is a throwing weapon that originated in the Americas
and consists of two weights at opposite ends up a rope to make a heavy,
tangling projectile) to open up new areas in the game. Nuna and her fox
will adventure together and solve puzzles throughout the 8 separate
chapters of the game.
The game is mostly set in the cold, harsh and often hostile
environment of the Alaskan tundra and reflects a very real but wholly
natural threat to Nuna and her Fox.
Never Alone (Kisima Inŋitchuŋa) (Kisima Ingitchuna)
Developer(s) Upper One Games
Publisher(s) E-Line Media
Engine Unity
Platform(s)
Linux
Microsoft Windows (PC)
OS X
PlayStation 3
PlayStation 4
Wii U
Xbox One
iOS
Android
Release date(s)
PC Microsoft Windows
November 18, 2014
PlayStation 4
NA: November 18, 2014
EU: November 26, 2014
JP: December 11, 2014
Xbox One
November 19, 2014
OS X
February 26, 2015
Wii U
NA: June 25, 2015
EU: July 9, 2015
PlayStation 3
EU: December 22, 2015
NA: December 23, 2015
Never Alone + Foxtales DLC + Soundtrack (PC, 2014)
Price: US $4.59
This game Development
Never Alone was developed by Upper One Games in conjunction with the Cook Inlet Tribal Council, a non-profit organization that works with indigenous groups living in Alaska's urban areas. The Council met with video game education company E-Line Media and generated the idea for Never Alone as part of a series that "shares, celebrates, and extends culture". The Council's for-profit Upper One Games is the "first indigenous-owned video game developer and publisher in US history". They built the game to explore "what it means to be human" and intergenerational stories. It is intended both to share the stories of native culture as entertainment, and to revitalize interest in Alaskan indigenous folklore. Proceeds from the game will fund the Council's education mission.
E-Line creative director Sean Vesce was excited by the idea and challenge of leaving his cubicles where "a bunch of white guys" discuss fictional fantasies and instead work to build a game around a community's "values and mythologies". He had previously held leadership positions at Crystal Dynamics and Activision. They built a 12-member development team in Seattle, who worked with a group of Alaska Native community storytellers and artists to craft the game. The development team's writer was an Alaskan Native. Never Alone was built in the Unity game engine. A local-cooperative mode is available.
Never Alone received "mixed" reviews, according to video game review aggregator Metacritic.
Critics positively noted the game's art design, which blends a simple, cartoon style with scrimshaw influences. The included documentary videos were also remarked upon as "[leaving the player] feeling educated as well as entertained" and "[doing] an excellent job of giving a cultural context" for the game.
The platforming elements of Never Alone were more divisive. Some reviewers described the game as "frustrating", noting imprecise controls and inconsistent behavior by in-game characters. However, other critics felt the gameplay was diverse and "satisfying".
The first expansion for the game, titled Never Alone: Foxtales, was announced on July 16, 2015. Adding new levels and expanding upon the story, the expansion was released worldwide on July 28, 2015 for Microsoft Windows, PlayStation 4, and Xbox One.
snowboarding game by the pro – Infinite Air with Mark McMorris
Mark McMorris Infinite Air aka Infinite Air with Mark McMorris
Join pro snowboarder Mark McMorris and an elite crew of riders in a vast, open-world snowboarding experience. Compete in authentic events, drop in on any mountain peak by helicopter, and design your own snow parks to shred with the World Editor.
You can even save and share your creations online, and Mark McMorris Infinite Air is clearly geared up towards the online world.
About This Game
Mark McMorris Infinite Air is a fresh welcome into snowboarding for newcomers and a challenging step into untracked territory for seasoned boarders. Get ready to shred custom-built runs and show off gnarly tricks across vast, personalized terrain parks and 100+ square miles of backcountry. Awe-inspiring environments, fluid snowboarding maneuvers and authentic competitions craft an exhilarating and realistic experience on the snow.
Infinite Air is equipped with an enhanced editor that allows players to create custom parks for complete immersion into the sport of snowboarding. Get to know the snow like never before as you build the ultimate runs with jumps, cliffs, rails, ramps, and countless other items, taking the next step to defining your riding style! Challenge friends to ride your runs and compete in real-world competitions like Slopestyle and Big Air! Drop in by helicopter anywhere you wish, on fresh powder in the backcountry or awesome runs in the park!
• Ride with the Pros Join top snowboarder Mark McMorris and other pros in the most authentic snowboarding game to date.
• Genre-Defining Realism Fluid analog controls and physics-driven animations capture the true feel of snowboarding, allowing for skill-based trick executions and your own flavor of creativity.
• Challenge Your Friends Compete in real-world events and go head-to-head in Slopestyle, Big Air, and Halfpipe competitions.
• Infinite Runs to Ride Procedurally generated mountains and an intuitive map editor deliver an infinite number of mountains to explore and big air to find.
• Share and Explore Share your course creations with friends online, and explore the best runs the community has to offer.
Genre: Simulation, Sports Developer: HB Studios Publisher: Maximum Games Release Date: Oct 24, 2016 Available Platforms: Windows, Xbox One, PlayStation 4 Reviewed Platforms: Windows
PC System Requirements
Minimum:
OS: Windows 7 64 bit, Windows 8 64 bit, Windows 10 64 bit
Processor: Intel Core 2 Quad Q8200 @ 2.3ghz or equivalent
Memory: 4 GB RAM
Graphics: AMD Radeon 5750 or NVIDIA GTX 650 with 1GB video RAM
DirectX: Version 11
Network: Broadband Internet connection
Storage: 3 GB available space
Sound Card: DirectX 9.0c compatible
Additional Notes: A PC-compatible gamepad is required.
Recommended:
OS: Windows 7 64 bit, Windows 8 64 bit, Windows 10 64 bit
Processor: Intel Core i5 or equivalent
Memory: 8 GB RAM
Graphics: AMD Radeon 7850 or NVIDIA GTX 660 with 2GB video RAM
DirectX: Version 11
Network: Broadband Internet connection
Storage: 3 GB available space
Sound Card: DirectX 9.0c compatible
Additional Notes: A PC-compatible gamepad is required.
A Snowboarder’s Game: Fly around, build ski path & snowboarding
Infinite Air with Mark McMorris attempts to carve a path in the extreme sports genre, but falls terribly short. The graphical fidelity, open presentation, and style of control are all great ideas that logically should make for an equally great game. However, the final product just isn’t all the way there. Mark McMorris may not be a household name, and now after this game, will be the name you remember not for fondness, but rather for what it could be.
Infinite Air with Mark McMorris tries to invoke those feelings of playing Skate for the first time with its control layout. Here, you use the left stick for movement, the right stick for tricks, triggers for loading a jump and trick modifiers. Now, this review was done on PC, I should note that the game does not support keyboard and mouse other than in menus. In fact, the mouse cursor likes to stay on-screen while you’re using a controller. It’s a weird omission, but the controller would feel the best for what the controls are asking you to do. The controls often work against you. They don’t lend themselves to allow you to get back moving again if stopped due to something, so you’ll be often moving like you’re stuck in quicksand trying to get momentum to move on. Crashing or bailing out of a trick has you hilariously slide for an extended period of time before you can “get up”, though you can alternately respawn at the expense of starting over. One of the more infuriating things was never being able to stop or slowdown in a spin or flip, you can’t seem to just land without killing yourself. Infinite Air with Mark McMorris has an open-mountain to explore or take part in challenges that provide progression. The progression is stale is merely checking off boxes to complete challenges that unlock more areas. If you’re not skilled enough to continue, you’ll be held back similarity to Tony Hawk’s Pro Skater, but because the presentation is lacking, it all feels directionless in a bad way. Infinite Air does some cool things like letting you use a helicopter to get around the mountain and drop in as you see fit. This type of freedom I can get behind, but it is just such a hollow experience.
The cast of Infinite Air is pretty solid, featuring the man himself, Mark McMorris. Other playable characters include Ulrik Badertscher, Danny Davis, and Torstein Horgmo. Unless you follow snowboarding, these names will mean very little to you. The tutorials are voice rather poorly, coming across as flat and/or uninterested in what they are saying, despite it being very helpful for you to understand how to play the game.
Graphically the game looks excellent in motion, and less so while still. And if you come to a complete stop like I mentioned before, you’ll have nothing but time to look at your surroundings as you try to get yourself unstuck. I noticed that effects like depth of field and blur make the game look much better on PC when they are turned off. The depth of field and blur effects are far too intense, and make the game look worse than it is.
You may remember HB Studios for creating The Golf Club, the golfing was solid, and the courses were generic, but the presentation and execution were really solid. The included course generator there really lengthened the game to be able to create your own courses. The same can be found here in Infinite Air. The controls and UI are intuitive for anyone to create fun levels on randomized mountains that perhaps are more fun than the courses found in the main game.
The game does have a multiplayer mode, but it seems dead on arrival. I attempted to join several multiplayer sessions at different times of the day, and the mountain is empty as the single-player mountains. There just doesn’t seem to be anyone playing the game, so I never got to see what it was like to ride down a mountain with a buddy.
Infinite Air with Mark McMorris is part of a trio of snowboarding games each trying to get your attention. Infinite Air could be a lot better, but there’s not a proper attitude to excite you to want to keep playing. It just becomes hard to recommend with how shallow the game is. If you’re hard-pressed for something on PC, or even on consoles for snowboarding, there will be other options. If this is the one you settle on, buy it when it is discounted.
Forge By Games
#ForgeByGames #snowboarding #McMorris #InfiniteAir #snowboarder
Get your copies of the games: Infinite Air with Mark McMorris or Mark McMorris Infinite Air
Windows
Xbox One
PlayStation 4
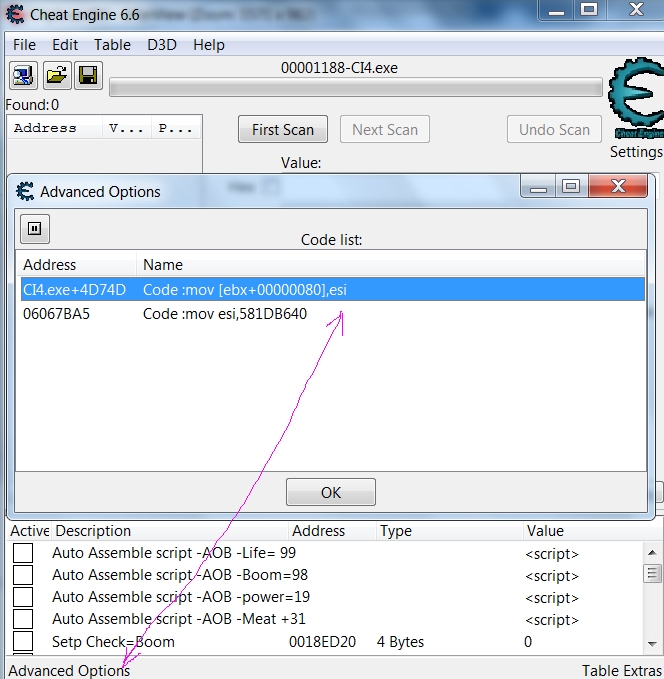
Find out what write to this address, Show disassembler, Break and trace instructions, Debug – Toggle Break Point, memory view – tools -auto assemble – template – AOB injection
Basic encryptions, debugging, backtracing and some info on the stack
I am the newbie in cheat engine, but I learn from the best.
Original article is by – Geri , I only put in the pictures & reedit a bit.
The original is lost in the net, or is just me, I can’t find his original post
on the net. All I can find is the copy of his post without pictures, some also
without credit to Geri.
Geri tutorial is very good, I just hate it if it gone like that. I giving back the full credit to Geri. Thank Geri. Rest In Peace. He passed away in summer 2015.
If you have play this game before, you may know that I have unlock all the key, using Cheat Engine and the knowledge I learn. I still learning, and so many too learn. But without Geri, I will still be zero until now.
Below here is a from Geri + my own picture
If some of you found Geri’s Original article, please let me know.
Usually I don’t write any tutorial where the target process is not freely available, but recently I found a game which is small enough, somewhat popular amongst kids and most importantly, it is a fine example to show basic encryptions.
This tutorial will cover info about basic encryptions, checking values in the stack and backtracing some functions in the program.
I will use Cheat Engine 6.0 so get the latest version from here: { year 2017 now is ce 6.6}
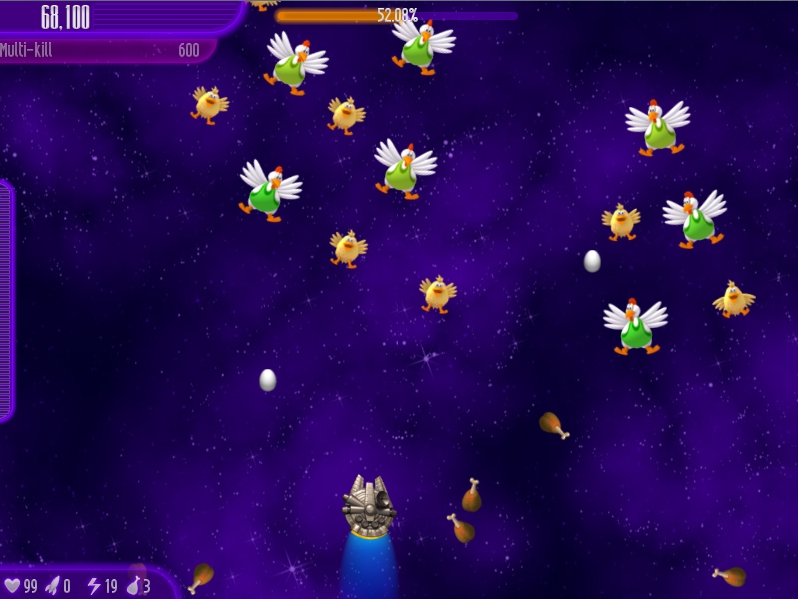
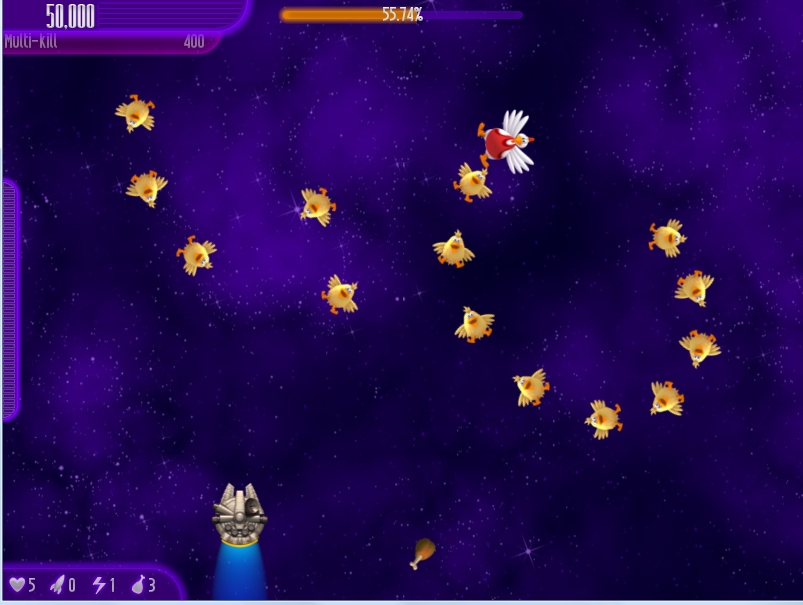
The game that I will use is Chicken Invaders 4, but this tutorial contains generic information that can be used in other programs too.
Alright, the first step is to aquire the target process, Chicken
Invaders 4 v4.00. This is the program and the exact version that I will
use for the demonstration. If You have installed the game, play with it a
bit to get familiar what kind of game is this. A simple space shooter
against evil chickens. Ridiculously stupid concept but the game itself
(regarding the programming, graphics and music) is not a bad job. Now
change the game to run in window mode (not in fullscreen).
Mission 1: Finding some values
In this whole tutorial, we will try to change the amount of lives. If
You have tried to search for it, You have probably failed miserably.
The reason of this failure: the game is using encrypted values to store
the lives, points, food, missiles and keys. What You need to do is set
the value type to Byte and search for changed/unchanged values when You
die.
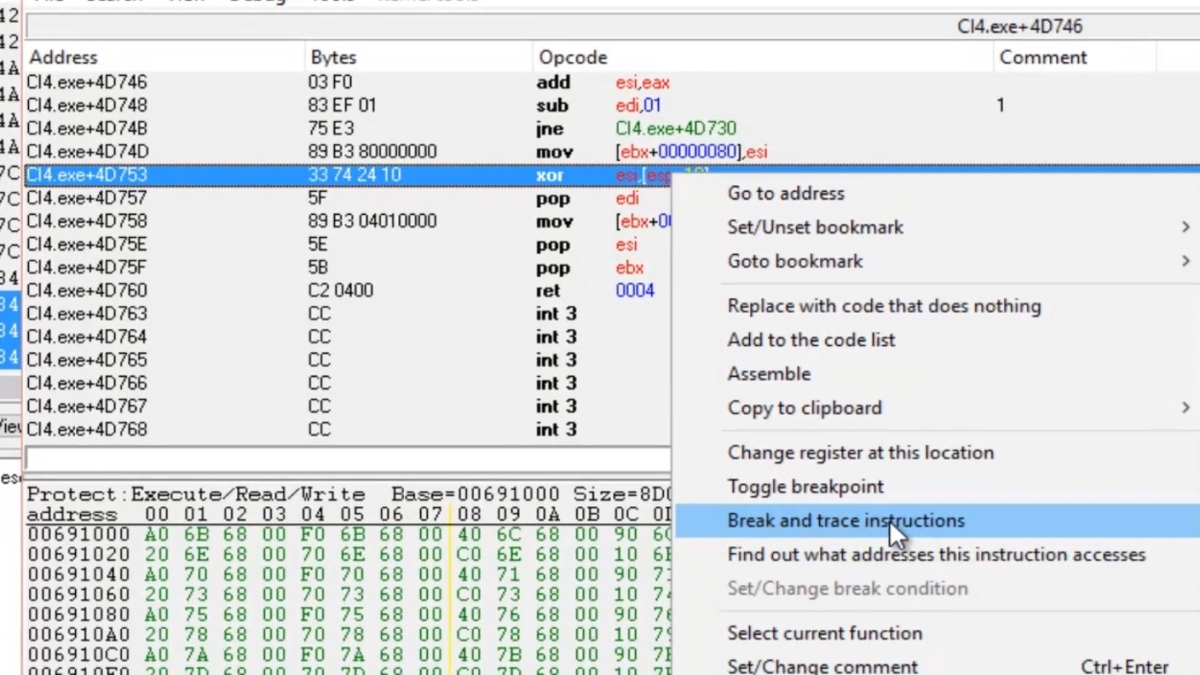
You will find some high values which are not making any sense at all. Check out what is accessing to the address that You have found and You will see these codes:
0044DB20 – 8B 81 04010000 – mov eax,[ecx+00000104]
0044DB26 – 33 81 80000000 – xor eax,[ecx+00000080]
0044DB5D – 89 B3 80000000 – mov [ebx+00000080],esi
0044DB63 – 33 74 24 10 – xor esi,[esp+10]
0044DB67 – 5F – pop edi
0044DB68 – 89 B3 04010000 – mov [ebx+00000104],esi
NOTE: You can search for food or points too if it is easier for You. You will find these same codes.
Mission 2: What is the encryption
Ok You should have found the codes that I have mentioned and if You look at it, You will find the XOR instruction in every cases. XOR is used in encryptions very frequently. In fact, most encryptions in the games are using a simple XOR instruction to mess up the value and confuse beginners. It is very easy to understand the process if You know what is this instruction. Let me quote from another author a bit:
The XOR instruction connects two values using logical exclusive OR (remember OR uses
inclusive OR).
To understand XOR better, consider those two binary values:
1001010110
0101001101
If you OR them, the result is 1100011011
When two bits on top of each other are equal, the resulting bit is 0. Else the resulting
bit is 1. You can use calc.exe to calculate XOR.
For more information, use Google. Teaching Boole-algebra is not part of this tutorial.
If You have understood what is the purpose of this instruction, You realize that the value You are searching for is combined together from 2 values. By looking at the codes, it is obvious what are these values.
0044DB20 – 8B 81 04010000 – mov eax,[ecx+00000104]
0044DB26 – 33 81 80000000 – xor eax,[ecx+00000080]
One of them is stored on [ecx+0104] and the other value is stored on [ecx+0080]. Using the debugger to find out what addresses accessed by these codes, You can find the key values for the lives. Very good, now set both values to 0, and You should have 0 lives. Awesome, now the only problem is that You have 0 lives on the screen but in reality, You have the same amount of lives as originally. Which means that all You have found and changed was the displayed value and You did not change the real amount of lives.
Mission 3: Checking the encryption codes
I bet this situation is familiar if You have tried to cheat in some games. The value is encrypted and/or You didn’t find the real value and You have achieved changing the displayed value only. No problem, this will be enough to create working cheats. First, we need to look at the codes:
0044DB26 – 33 81 80000000 – xor eax,[ecx+00000080]
This code is running frequently, READING a few values. Obviously, it is not reading the number of lives only, but some other stuff too.
0044DB5D – 89 B3 80000000 – mov [ebx+00000080],esi
0044DB63 – 33 74 24 10 – xor esi,[esp+10]
0044DB67 – 5F – pop edi
0044DB68 – 89 B3 04010000 – mov [ebx+00000104],esi
This code however is used only when a value is changing. This is the code which is WRITING to our value. Let us take a look at it. We can see that ESI register is used to hold some important information and hey, it is using xor on some address, [esp+10]. Just out of curiousity, let us take a look what is stored on [ESP+10].
Start a new game, and You will have 5 lives.
Now You have 2 choices to check this value.
1. Right-click on the code and use “Break and trace”.
2. Press F5 to set a manual breakpoint.
If You have done it, go back in the game and die. Don’t kill anything or pick up anything, just die. If You have used Break and trace, You can see these important information:
ESP: 0012EB10
xor esi,[esp+10]
0012EB20 = (dword)00000004(4)
If You have set a manual breakpoint, the game is now freezed and You can see the value of ESP, 0012EB10. ESP+10 is 0012EB20 and if You add this address to Your table, You can see that the value on this address is 4. Press F5 again to remove the breakpoint and press F9 to enable the program to run. If You have done this, You can see that the value on Your address is changed immediately.
Very good, we had 5 lives, we have died and ESP+10 shows 4. If You die again, it will show 3. It is clearly holding a DECRYPTED value for our lives.
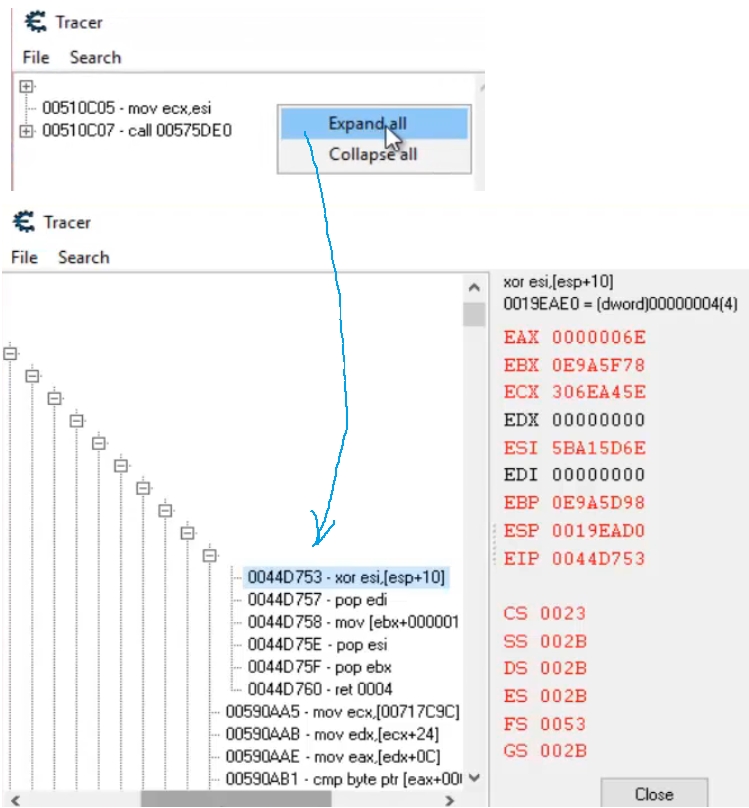
A picture from the trace window when the code was running:
NOTE: More experienced users will know that we can use conditional breakpoints to work with harder codes, but it is easy to work with this one so we will use this.
Mission 4: The Stack
You can find many info about the stack if You use Google, but for now, I will tell You a few things only which are neccessary to proceed in Your mission. The stack is a temporary storage area and it is very important for some functions. Let me quote from my old tutorial:
The stack is a “storage” where You can put values and load them from it. However You are not able to save and load the values in any order. The last value in the stack that You push in will be the first one that You pop out.
For example lets assume ecx=3, edx=2 and the stack stores the following values.
4
5
6
Now we put an instruction like “push ecx”. Then the stack will look like this.
3
4
5
6
Now we also put in edx with “push edx”. The stack will look like this.
2
3
4
5
6
Now we want to pop a value from the stack, like “pop ecx”.
In this case, the program will pull out the first value from the stack, which is 2,
and put it to ecx. So ecx=2 and the stack look like this.
3
4
5
6
If we give a “pop edx” instruction now, edx will be 3, and the stack will look like
4
5
6
The result: The stack is the same as when we have started, but ecx=2 now, and edx=3, we have changed their values with each other.
Alright, now You know how are values pushed in and pulled out from the stack. It is not a random process, it is working in strict order. The next thing You need to learn about a bit is the stack pointer and how it is used. In my example, I will use a totally unreal sized stack which holds 16 bytes only.
The stack is using a reversed order, which means if a value is deeper in the stack, it means that the address is higher. Here is an example
0012FF00 4 //this address is the bottom of the stack and it holds a value, 4
0012FEFC 2 //this address is the next level in the stack, as You can see the address has been decreased with 4 bytes
————————————– //after this line, there are yet unused levels of the stack
0012FEF8 x
0012FEF4 x
The stack pointer: The stack pointer is showing the top of the stack, which is in our case the —————— line. The stack pointer is the ESP register. In our example 0012FEFC is the top of the stack, and this can be figured out by checking the value of ESP, which is 0012FEFC.
Now let’s push something in the stack.
Assume that the next instruction is:
push 8
After this instruction, our mini-stack will look like this:
0012FF00 4 //this address is the bottom of the stack and it holds a value, 4
0012FEFC 2 //this address is the next level in the stack, as You can see the address has been decreased with 4 bytes
0012FEF8 8
————————————– //after this line, there are yet unused levels of the stack
0012FEF4 x
We have pushed a value in the stack and the top of the stack has been decreased with 4 bytes again. Now ESP = 0012FEF8 and the value on 0012FEF8 is 8.
Let us push another value again, let’s say 5.
push 5
0012FF00 4 //this address is the bottom of the stack and it holds a value, 4
0012FEFC 2 //this address is the next level in the stack, as You can see the address has been decreased with 4 bytes
0012FEF8 8
0012FEF4 5
————————————– //after this line, there are yet unused levels of the stack
Now as You see, the top of the stack has been (again) decreased with 4 bytes. ESP = 0012FEF4 and the value on 0012FEF4 = 5.
So what happens if we need to know the value on 0012FEFC for example? This is very simple, let me add an extra coloumn to our example to show ESP.
0012FF00 4 ESP+0C //this address is the bottom of the stack and it holds a value, 4
0012FEFC 2 ESP+08 //this address is the next level in the stack, as You can see the address has been decreased with 4 bytes
0012FEF8 8 ESP+04
0012FEF4 5 ESP
————————————– //after this line, there are yet unused levels of the stack
As You can see from the example, the value on 0012FEFC is [ESP+08].
And now finally, let’s assume we need the value from the top of the stack and we don’t need it after that so it can be removed. We will use this instruction:
pop eax
This instruction will copy 5 to EAX register and the top of the stack will move again.
0012FF00 4 ESP+08 //this address is the bottom of the stack and it holds a value, 4
0012FEFC 2 ESP+04 //this address is the next level in the stack, as You can see the address has been decreased with 4 bytes
0012FEF8 8 ESP
————————————– //after this line, there are yet unused levels of the stack
0012FEF4 x
I hope this example has clearly shown what is the purpose of the stack pointer (ESP) and how is the stack used to store information. If it is not clear, it may help if You trace any kind of code and examine how is the stack working in that code.
Final Mission: Backtracing
Now back to our original mission and as now You are familiar with the stack, it is time to examine our code again.
xor esi,[esp+10]
If You make a script to change [ESP+10] to 99, You will notice that You will really have 99 lives. And You will also have 99 points, 99 food, and 99 missiles. This is because the code is used to work with other values too, not just with the lives. So what now? We can’t use this code to make an unlimited lives cheat.
It should be clear by now that ESP+10 is an address in the stack. This means that the real number of lives are stored somewhere, then it is decrypted, moved into the stack and used by the function that we have found. Our task is to find the code which is moving the value into the stack.
If You have examined the code when the lives were changed, You may have noticed that ESP was always 0012EB10 when our code was running. So when this code:
xor esi,[esp+10]
is used to change the lives, ESP+10 = 0012EB20.
What we need to do is find the code which will copy the number of lives to 0012EB20. Though this is a temporary storage only, I guess You have realized that we could just write a script to change 0012EB20 when this code is running, but we will not do that because it would be lame. We will do it the right way and we will find the code which is putting the value in the stack to see where it is stored.
What we need to do now is a little backtracing. You can see that the Break and trace option is capable of tracing the running code from some point. But how do we go “back in time” to see where did the code came from? Yeah, I see You are thinking “we will just scroll up in the disassembler view”, but it is not that simple. You have to learn a bit about functions.
A program is full of functions. The purpose of the function is to execute some task, than return to the point where it was called. In our case, the code we have found is part of a function to encrypt/decrypt values and it is called from many places to do this task. After it is done, it will return to the place where it was called and the program will go on. Of course some tasks are so big that it can be breaked down to smaller tasks. If You think about it this way, You realize that a function can have many sub-functions, those sub-functions can also have sub-functions etc to break down the whole process to small bits and pieces. So how is it working?
You can use a function with the “call” instruction. When call is used, the program will jump to the given location and start executing the function. The function will end with the “ret” instruction. If ret is used, the program will jump back to the same location right after the address where the call was used. Ret will always jump to the location of the last call, so it will work like this:
call 1
do things
call 2
do things
ret (jump right after call 2 in the code)
do things
ret (jump right after call 1 in the code)
do things
So why is this important? Let’s assume that our code is working like this.
call 1
do things
put the number of lives in the stack
call 2
do things
call 3
do things
call 4
do things
call 5
do things
xor esi,[esp+10] (our code)
ret
do things
ret
…
ret
…
ret
…
ret
…
We want to find the code “put the number of lives in the stack”. For this, we need to find where is “call 1”, then trace from there and find the code. We start from a tiny sub-function, and we need to go “backwards”. How can we do this? By following the return points. Don’t forget, if You know where is the program returning to, You will know where the function was called. And as the ret instructions are AFTER our code, we can trace them and see where the program is jumping, so we will have not just the return points, but the entry point of the functions too.
I hope it is clear so let’s start. First, add 0012EB20 to Your table as we will look for an instruction where 0012EB20 is changed to the number of our lives. Then start a game, right click on the “xor esi,[esp+10]” and use Break and trace. All You have to do now is die once. Your trace should be ready. Right-click in the trace window and choose “Expand all”.
NOTE: Return addresses are stored in the stack but as CE 6 has a very nice tree view which shows the return points, we don’t have to bother too much to find them. This is why the new trace window is one of my favorite options.
You can see our first instruction, “xor esi,[esp+10]”. A few instructions later, there is a ret. Let’s see the next address after the ret:
00591215 – 8B 0D 9C7C7100 – mov ecx,[00717C9C] : [012560A8]
A picture from the trace:
Now scroll up a line:
00591210 – E8 1BC9EBFF – call 0044DB30
00591215 – 8B 0D 9C7C7100 – mov ecx,[00717C9C] : [012560A8]
So our function was called from here. Let’s set a breakpoint on this call. Click on it and press F5. Now loose a life. The program is now stopped. Look at our address in the table, 0012EB20. It is already holding the number of our lives, so it was copied there before this function. We need to go back further. Press F5 on the code again, and press F9 to enable the program to run. Look at our trace and find the ret instruction which will bring us back with one level. As You scroll down, You will see a few sub-functions, only a few lines of codes, but we don’t need them, we want to go back with a level so find the place where the tree will go back with a level.
The next code that we will find is this:
00591CF7 – E8 D4F4FFFF – call 005911D0
00591CFC – C3 – ret
Another picture to show the ret for this step:
Set a breakpoint on this call again and die in the game. Ok, the game is stopped. Look at 0012EB20. It has a value which is definitely not the number of remaining lives. This means that the code which will put the value on this address is not executed yet. Now we step in the code very slowly and see what happens with the value on 0012EB20. Press F5 to remove the breakpoint and then press F7. Now You have stepped one line in the code and You are at 005911D0, where the function is starting. Step again and again and again. And after every step, look at 0012EB20 in Your table to see if it was changed.
0012EB20 will change to the number of Your remaining lives right after this code is executed:
0059120D – 50 – push eax
This means that Your lives were stored on eax and were pushed into the stack by this command. Very good. Scroll up a bit to see the whole code:
00591203 – 8B 44 24 24 – mov eax,[esp+24]
00591207 – 8D B5 E0010000 – lea esi,[ebp+000001E0]
0059120D – 50 – push eax
From these few lines, it is clear that eax is copied from [esp+24], from the stack and then it was put at the top of it. Ok, save these codes and press F9 to let that miserable program to run already. We still don’t know where is the value stored in the memory, but we have a code which is working with this value and we can change it here. As a final test, put a breakpoint on this code and play the game to see that this code is used only when You loose or get a life. Well I can tell You this function is not used for anything else, so You can use code injection to change EAX or [ESP+24] at this point.
NOTE: Experienced users may consider setting a data breakpoint with Break on Write on address 0012EB20. This way they don’t need to use single stepping and the debugger will stop the program right after “push eax” is executed and the value on 0012EB20 is changed.
Here is a video about the final step, backtracing:
{ This video is made by Chris Fayte @ Cheat The Game – FaceBook Group
I can’t find Geri original video, but Chris video is so detail, maybe better than Geri ? Do any one have Geri original video ? }
Congrats, You have made Your “Unlimited Lives” cheat for Chicken Invaders 4 and hopefully You have learned new things that will help You to cheat in other games. Of course there are other ways to create this cheat too, but this way I could put many info into one tutorial, using one game only.
Original article is by – Geri , I only put in the pictures & reedit a bit. All credit go to Geri , I also wish to thank Chris from Facebook group Cheat The Game. Without Geri and you, I will fail many times and finally give up for game hacking this game.
* ps *
if you want more relate article about this game, cheating this game, please comment, I will write more about it.
Forge By Games #forgebygames #Geri #CheatEngine #encryptions #debugging #backtracing